We are showing voice control home automation system to control appliances with own voice command an Android app IoTBoys. Build one yourself by following this step by step guide and control your home. Yes, we often update all our eBooks, so everyone who purchases gets free lifetime updates. You’ll also have access to future content that we might add to the eBook.
It’s fairly easy to replicate and requires only a handful of components. Arduino community member Roboro built this project where he connected a stationary bike to an Arduino Nano, allowing him to control the streaming of Netflix on a PC. While we used a single relay in this example, you can easily expand your system by using a multi-channel relay module.
Step 10: Final Output
Stop the Heimcontrol app if it's running and install the Arduino bridge using the following command. I've used some reasonably cheap £20 sets from Maplin which come with 3 sockets, and opened up the remote control so I could interface directly with the 433 MHz chip inside. The installation process is quite laborious, and derived from the instructions here. Unfortunately, these were outdated or not designed for Raspian, so I've adjusted them heavily below. The codes below can mostly be pasted in blocks - you needn't paste one by one.

While this is usually best done using alogic level converter, we’re instead just using a simple voltage divider to convert the 5V signal into a 3.3V signal. This is because the Arduino is based on an ATmega328 microcontroller which defines a logic high as any level above 3V. 1) Connect the Arduino’s +5V and GND pins to the bus strips on the breadboard, as shown in the above circuit diagram. Make a table arrangement with 3 rows, and add a label to each row, for individual lights.
Home Automation using IoT Project Description:
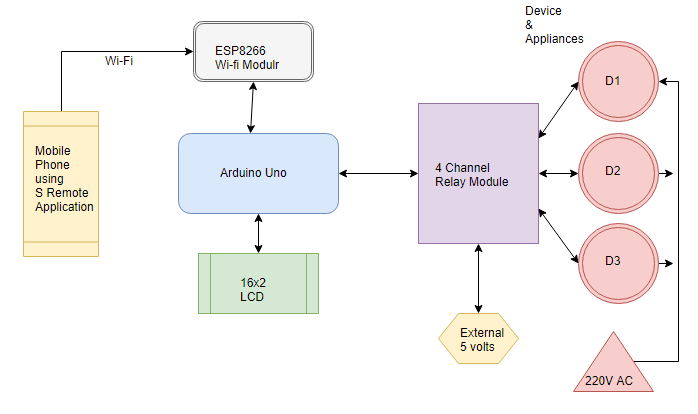
You can create a project in the Blynk app and add a variety of Widgets to it. For example, you can configure a button to turn an LED on and off. 1) First, connect the 5V and GND pins of the relay module to the bus terminals on the breadboard. First, we start by including the software serial library, which will be used to establish communication between the HC-05 Bluetooth module and the app. Home Automation System Using Arduino that can control electrical devices like lights, fans, garage doors etc using our mobile phone from anywhere around the world.
Then, you can connect the ESP boards to actuators to actually control something and to sensors to monitor your house. In this Module, you’ll get started with Node-RED software on the Raspberry Pi. You’ll install Node-RED, learn some basic concepts, and create simple flows to control the Raspberry Pi GPIOs.
Steps :-
I'm going to leave it here at this point, but sensor readings and IR remotes are also supported. I'll probably revisit these at a later date with some more enhancements. If this has all been a little too complex for you, perhaps check out these beginner-friendly Arduino projects.
2) Power the HC-05 module by connecting the 5V and GND pins to the bus strips on the breadboard. Finally, in the void loop, we check for commands from the Bluetooth serial and turn on and off the lights accordingly. BTserial object, you would have to mention the order of the Tx and Rx pins as connected in the Arduino.
MODULE 0: Introduction
Includes all the source code, schematics, and screenshots that are easy to follow. In the end, we’ll show you how you can create a secure tunnel to access your home automation system from anywhere in the world. InfluxDB provides tools to build customizable awesome charts and graphs to display and monitor your data on a dashboard. The Arduino must have this code uploaded - I suggest you copy and paste to install this from a different computer. It's essentially a listener program that responds to serial commands from the Pi, but there's nothing to stop you extending it with your own features.
You can also purchase individual 433 MHz transmitters ready for use on eBay or from hobby electronics suppliers. All you need to is connect the VCC to 5 V on the Arduino, the GNDs, and a single control pin - remember which one you used. This last command will launch the Mongo server, and you'll need to open a new Terminal to continue with the other commands. I'm not entirely confident of this step, so if anyone can correct this in the comments on how to have mongod launching automatically on start up, it would be much appreciated.
Connect the other terminal of the AC power supply to the NO pin on the relay. Connect one terminal of the AC power supply to one terminal of the load. Connect the other terminal of the load to the common pin on the relay. An advanced home automation project with Arduino Uno and Bluetooth sensor to control it, anytime from anywhere. I used Altium designer to draw the circuit and design the PCB. It is a powerful tool that can be used to design and create our own PCBs for our project as well as complex and multi-layer PCBs for industrial use.
In Module 9, if you want to access your Home Automation System outside your local network, you’ll need a domain name. You can use a free domain name or you can get a paid domain name in order to create a secure tunnel with Cloudflare. If you don’t have a Raspberry Pi, you can use Digital Ocean , but you’ll need to pay for a monthly plan. You can create rules on Node-RED and schedule events to make things happen automatically. For example, turn something on or off depending on sensor readings, day and time of the week, etc. The following diagram shows a quick overview of the system you’ll learn how to build.
Simply unplug the jumper wire connected to Pin 0 on the Arduino UNO , and re-attempt the code update. After you have successfully wired things up, the next step is to upload the code to the Arduino. If the red and blue LEDs on the HC-05 are blinking, then you have successfully connected the Bluetooth module with the Arduino. This is called a resistor divider because it divides down the input voltage. We obtain the 3.3V level signal from the intersection of these two resistors. This connection will form the second half of the two-way communication and is how the Arduino sends information to the HC-05.
You’ll also learn about Node-RED dashboard, a set of nodes to easily create a user interface. Node-RED is a powerful open-source tool for building Internet of Things applications with the goal of simplifying the programming component. You can build a complete home automation system without having to write a single line of code.
With his system you can monitor for water leaks, see if the garage door is open, check for new mail, watch for movement, sense for gas, and even see how the dog is doing. The system uses both an Arduino and a Raspberry Pi alongside a ton of various sensors to monitor the house. You can set up the system to send you alerts when something happens or just monitor everything from your phone. Blynk is a platform with iOS and Android apps that allows you to control your Arduino, Raspberry Pi, or ESP8266 from your mobile phone.


No comments:
Post a Comment