Table of Content
Here is a Simple DIY Home Automation System Code, you can copy the code and paste it in your Arduino IDE. But before that, you need to add Blynk Library to Arduino IDE. Finally, you can use nodemcu to create a home automation system that is completely customised to your needs. Maker.pro needs to review the security of your connection before proceeding. Here is a link for a small solid state relay package that is offered in 2,4, or 8 channels. 2) Next, it will list all the available devices in your vicinity. You can either upgrade to a higher current relay, or place multiple relays in parallel.

The readings can be displayed on gauges and charts on Node-RED UI. You can control the ESP32 and ESP8266 boards via MQTT from Node-RED. Skyfi Labs gives you the easiest way to learn and build this project. After many hours of debugging the code, I found single digit pin numbers weren't working - make sure your transmitter is placed on pin 10 to be sure.
What’s inside the eBook?
Exercise and entertainment can be a perfect combination, with devices like the Peloton gaining lots of popularity in recent years. It can control the lights, windows, doors, and many other things in your house. The NodeMCU system is easy to install and use, and it’s compatible with a variety of home automation devices and appliances. Using the above setup, you can turn any device into a smart device that can be controlled from your smartphone. 2) Next, connect the IN1 pin on the relay module with PIN 4 on the Arduino. As shown in the circuit diagram, we’ve connected a 1k ohm and a 2.2k ohm resistor across the GND and TXD pins on the Arduino.
Needs to review the security of your connection before proceeding. Smart homes have many benefits, and it’s not all about convenience, security, and chores. Entertainment is a big part of what we do at home, and smart technology can help us maximize our enjoyment of our home entertainment systems and manage them more easily.
TV, DVD & Audio Control From Android and Arduino
Frogger1108 spent some time looking up how to build a pinball machine and found various homemade projects using Arduino. Instead of buying their own pinball machine components (which was expensive and time-consuming), Frogger1108 bought an old pinball playfield on eBay and used it for its parts. Nowadays, home automation is becoming increasingly popular as it can offer homeowners a lot of benefits.
I'm going to leave it here at this point, but sensor readings and IR remotes are also supported. I'll probably revisit these at a later date with some more enhancements. If this has all been a little too complex for you, perhaps check out these beginner-friendly Arduino projects.
Step 3: Step 3: Schematics
3) Once you select the device, you’ll be connected to the HC-05 transceiver. The app will now prompt you to enter the mode that you wish to use. We want to turn on the bulb only when we send a signal from smartphone. If you have a multi-channel module , you can connect IN2, IN3 … In with different digital pins on the Arduino, and repeat the steps below for configuring the other pins. We don’t use the STATE and EN pins on the HC-05 module, since they are not required for this setup. The HC-05 is powered using 5VDC but includes an on-board voltage regulator that generates a 3.3V supply to power the transceiver.

2) Power the HC-05 module by connecting the 5V and GND pins to the bus strips on the breadboard. Finally, in the void loop, we check for commands from the Bluetooth serial and turn on and off the lights accordingly. BTserial object, you would have to mention the order of the Tx and Rx pins as connected in the Arduino.
Then, you can connect the ESP boards to actuators to actually control something and to sensors to monitor your house. In this Module, you’ll get started with Node-RED software on the Raspberry Pi. You’ll install Node-RED, learn some basic concepts, and create simple flows to control the Raspberry Pi GPIOs.
Instead of using mechanical switches, you can now conveniently control all the devices in your home from your fingertips. In the void setup, we set up the serial monitor and virtual Bluetooth serial at 9600 baudrate. Next, we check what button was clicked in the horizontal component, and send the appropriate message to the HC-05 module. Next, make a function to auto-connect to the HC-05 Bluetooth module when the screen is initialized.
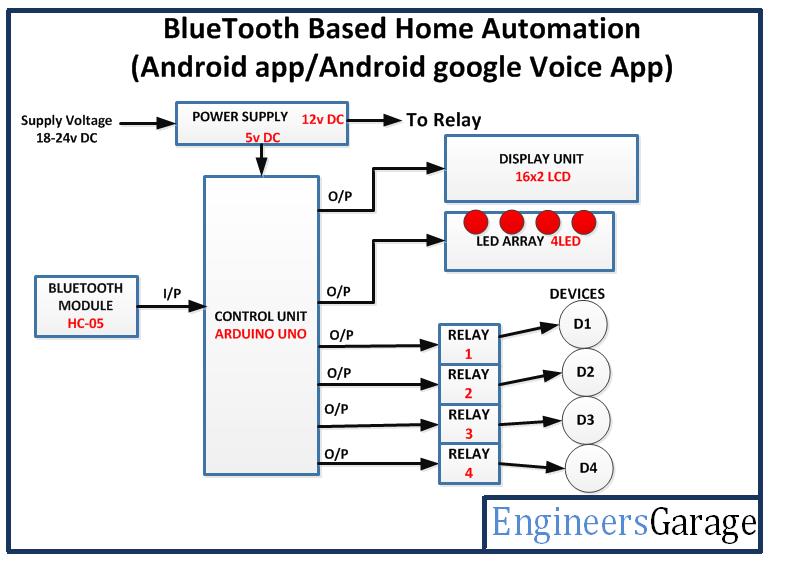
You can create a project in the Blynk app and add a variety of Widgets to it. For example, you can configure a button to turn an LED on and off. 1) First, connect the 5V and GND pins of the relay module to the bus terminals on the breadboard. First, we start by including the software serial library, which will be used to establish communication between the HC-05 Bluetooth module and the app. Home Automation System Using Arduino that can control electrical devices like lights, fans, garage doors etc using our mobile phone from anywhere around the world.
If you get stuck at some point, you can use our forum to post your issue. You can also send us an email with your issue, and we’ll try to help as much as possible so that you get all examples working. We use Raspberry Pi to run Node-RED, Mosquitto MQTT broker, and InfluxDB locally.
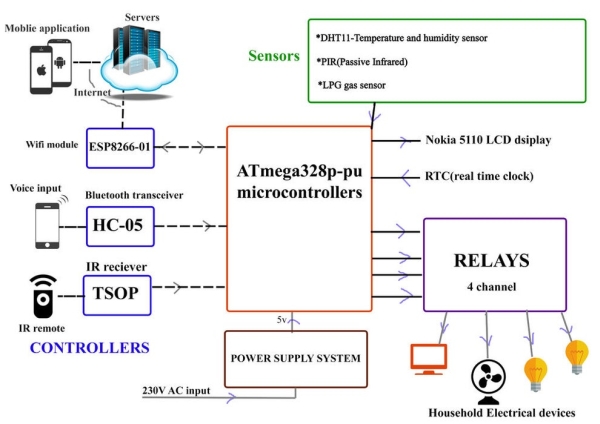
If the connection is successful, we show an alert, saying that the connection was successful. Control and monitor the home environment using Android app with advanced features such as voice command, scheduling, home preparing itself. Sir,I am trying to make that project from previous 7 days continously but I can't able solve solve coding problem .Please send me whole genuine code to resolve my problem please. I’m Sara Santos, and I work with Rui at Random Nerd Tutorials. I have a master’s degree in Bioengineering from FEUP, and I’m the co-author of the “20 Easy Raspberry Pi Projects” book. I’ve also written several eBooks with Rui related to ESP32, ESP8266, Firebase, and much more.
This tutorial will show you how to setup a simple home automation solution allowing you to control almost any electrical device from your smartphone. From controlling the room lights with your smartphone to scheduling events to occur automatically, home automation has taken convenience to a whole new level. Node-RED and InfluxDB are free to use locally on your Raspberry Pi.
From there you can add a new item, choosing RCSwitch method, the pin of your transmitter, and the tristate address code. Remember to save, then head back to the main screen screen for your new button. Communication with the Arduino is done using a Node library called duino.

No comments:
Post a Comment